← 返回列表
🔗 原文
逆向工程与自托管OBI Smart Energy Tracker
Reverse Engineering and Self-Hosting the OBI Smart Energy Tracker

Sold by German DIY store OBI, the OBI Energy Tracker is a €15 set of two devices, one of which you essentially stick on top of your existing electricity meter. This then allows for electricity usage to be measured and tracked, with the data sent to the second, gateway device. This latter cloud-bound device is linked to an OBI account via the heyOBI app. This correspondingly called for the gateway device to be reverse-engineered and freed from its cloud-based shackles, a task that [Aaron Christophel] happily took upon himself.

The whole process is also covered in two videos, with the first providing all the essentials on reprovisioning the original firmware for a local MQTT server in English, while the second, German-language video focuses on custom firmware for the ESP32-C3 inside of the gateway device.
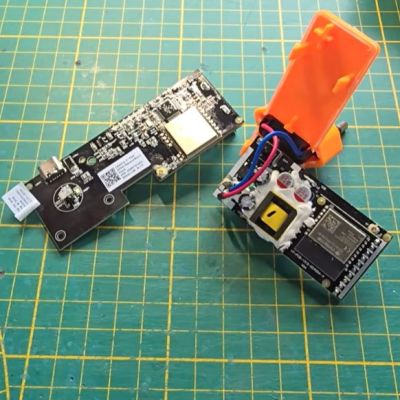
Inside the reader device is a Cortex-M0+-based BAT32G135 MCU that communicates with the meter via its IR protocol. This is then communicated via 868 MHz LoRa to the gateway device that will be placed somewhere within Wi-Fi reach by the user. Inside this latter device is as mentioned the ESP32-C3, which by default runs firmware that communicates via secure MQTT with an AWS cloud instance for the typical cloud-based shenanigans.

The aforementioned reprovisioning option doesn’t require firmware flashing, just a handful of steps to follow. This involves fetching the 32-bit TEA key, generating your own PKI, running your own MQTTS-capable broker and having the provided Python script handle the rest from there.

Flashing custom firmware is the other option, with straightforward UART/JTAG reflashing sadly disabled by the manufacturer. With the effort required here you could perhaps argue that simply connecting the reader device to a custom gateway device might be a lot easier, especially if you already have a LoRa transceiver and associated hardware.

🤖 AI 总结
OBI Energy Tracker是一款15欧元的智能设备,贴在电表上实现能耗追踪,可通过逆向工程实现自托管。

Sold by German DIY store OBI, the OBI Energy Tracker is a €15 set of two devices, one of which you essentially stick on top of your existing electricity meter. This then allows for electricity usage to be measured and tracked, with the data sent to the second, gateway device. This latter cloud-bound device is linked to an OBI account via the heyOBI app. This correspondingly called for the gateway device to be reverse-engineered and freed from its cloud-based shackles, a task that [Aaron Christophel] happily took upon himself.

The whole process is also covered in two videos, with the first providing all the essentials on reprovisioning the original firmware for a local MQTT server in English, while the second, German-language video focuses on custom firmware for the ESP32-C3 inside of the gateway device.

Inside the reader device is a Cortex-M0+-based BAT32G135 MCU that communicates with the meter via its IR protocol. This is then communicated via 868 MHz LoRa to the gateway device that will be placed somewhere within Wi-Fi reach by the user. Inside this latter device is as mentioned the ESP32-C3, which by default runs firmware that communicates via secure MQTT with an AWS cloud instance for the typical cloud-based shenanigans.

The aforementioned reprovisioning option doesn’t require firmware flashing, just a handful of steps to follow. This involves fetching the 32-bit TEA key, generating your own PKI, running your own MQTTS-capable broker and having the provided Python script handle the rest from there.

Flashing custom firmware is the other option, with straightforward UART/JTAG reflashing sadly disabled by the manufacturer. With the effort required here you could perhaps argue that simply connecting the reader device to a custom gateway device might be a lot easier, especially if you already have a LoRa transceiver and associated hardware.

原文
Reverse Engineering and Self-Hosting the OBI Smart Energy Tracker

Sold by German DIY store OBI, the OBI Energy Tracker is a €15 set of two devices, one of which you essentially stick on top of your existing electricity meter. This then allows for electricity usage to be measured and tracked, with the data sent to the second, gateway device. This latter cloud-bound device is linked to an OBI account via the heyOBI app. This correspondingly called for the gateway device to be reverse-engineered and freed from its cloud-based shackles, a task that [Aaron Christophel] happily took upon himself.

The whole process is also covered in two videos, with the first providing all the essentials on reprovisioning the original firmware for a local MQTT server in English, while the second, German-language video focuses on custom firmware for the ESP32-C3 inside of the gateway device.

Inside the reader device is a Cortex-M0+-based BAT32G135 MCU that communicates with the meter via its IR protocol. This is then communicated via 868 MHz LoRa to the gateway device that will be placed somewhere within Wi-Fi reach by the user. Inside this latter device is as mentioned the ESP32-C3, which by default runs firmware that communicates via secure MQTT with an AWS cloud instance for the typical cloud-based shenanigans.

The aforementioned reprovisioning option doesn’t require firmware flashing, just a handful of steps to follow. This involves fetching the 32-bit TEA key, generating your own PKI, running your own MQTTS-capable broker and having the provided Python script handle the rest from there.

Flashing custom firmware is the other option, with straightforward UART/JTAG reflashing sadly disabled by the manufacturer. With the effort required here you could perhaps argue that simply connecting the reader device to a custom gateway device might be a lot easier, especially if you already have a LoRa transceiver and associated hardware.

中文翻译
逆向工程与自托管OBI Smart Energy Tracker

由德国DIY商店OBI销售的OBI Energy Tracker是一套售价15欧元的两件设备,其中一件基本是贴在现有电表顶部。这样就能测量和追踪用电量,数据会发送到第二件网关设备。这个云端设备通过heyOBI应用程序与OBI账户关联。相应地,这要求对网关设备进行逆向工程,使其摆脱云束缚,而[Aaron Christophel] 愉快地承担了这项任务

整个过程还通过两个视频进行了介绍,第一个视频用英语提供了重新配置原始固件以连接本地MQTT服务器的所有要点,而第二个德语视频则专注于网关设备内部ESP32-C3的自定义固件。

读取设备内部是一个基于Cortex-M0+的BAT32G135 MCU,通过其红外协议与电表通信。然后通过868 MHz LoRa通信到网关设备,用户会将其放置在Wi-Fi范围内的某处。如前所述,后者内部是ESP32-C3,默认运行通过安全MQTT与AWS云实例通信的固件,用于典型的云操作。

前面提到的重新配置选项无需刷写固件,只需遵循几个步骤。这包括获取32位TEA密钥、生成自己的PKI、运行自己的支持MQTTS的代理,并让提供的Python脚本处理其余部分。

刷写自定义固件是另一个选项,但制造商遗憾地禁用了直接的UART/JTAG重新刷写功能。考虑到这里所需的工作量,你可能会认为简单地将读取设备连接到自定义网关设备可能会容易得多,特别是如果你已经有一个LoRa收发器和相关硬件。